Code
%env WANDB_LOG_MODEL=trueenv: WANDB_LOG_MODEL=trueA co-worker showed me a notebook where they had trained BERT in a notebook and written the results, artifacts and fancy graphs to weights and biases. I was really impressed and this is my attempt to reproduce that.
It’s easy enough to train a model, the tricky bit is to record the training in a way that helps you when you train it the next time. That’s the attraction of weights and biases - it can track your training runs. If you can track your previous runs then you don’t have to repeat your previous work.
So lets try tracking training a model. I’m going to train a sentiment classifier. I’m choosing this because it’s a task that I can train with the transformers framework, which has an integration with wandb.
Lets start by initializing the weights and biases framework.
%env WANDB_LOG_MODEL=trueenv: WANDB_LOG_MODEL=trueThis makes the transformers trainer write the model to wandb at the end of training (docs).
from typing import *
import hashlib

def get_id_for_dict(config_dict: Dict[str, Any]) -> str:
    """ This function creates a unique hash
        based on the initial config dictionary
        that is used to label the model. """

    unique_str = ''.join(
        f"'{key}':'{value}';"
        for key, value in sorted(config_dict.items())
    )
    return hashlib.sha1(unique_str.encode('utf-8')).hexdigest()[:5]
It’s a good idea to name your runs in a consistent way. This takes all of the settings and creates a hash out of them, taking the first 5 characters. The same settings will result in the same hash.
Can include this in the name to spot if I use the same settings.
MAX_STEPS = 10_000
TRAIN_SIZE = 5_000
VALID_SIZE = 500

initial_config = {
    "max_steps": MAX_STEPS
}

RUN_NAME = "_".join(
    [
        f"{value}_{label}"
        for value, label in [
            (MAX_STEPS, "max_steps"),
            (TRAIN_SIZE, "train_size"),
            (VALID_SIZE, "valid_size"),
        ]
    ]
    + [get_id_for_dict(initial_config)]
)
RUN_NAME'10000_max_steps_5000_train_size_500_valid_size_bef9c'The original author of the notebook explained that they liked to have a cell where they define the different settings for the run. Then the settings can be easily changed when it was time to do another run.
I don’t have much to vary here as I am using the entire dataset. This would be a better example with more configuration settings.
import wandb

run = wandb.init(
    project="mf-blog-sentiment",
    name=RUN_NAME,
    config=initial_config
)I’m going to fetch the data from huggingface and then transform it into a pandas dataframe for ease of use. There is probably a better way to do this. This will let me adhere more closely to the notebook that I am following.
from datasets import load_dataset

dataset = load_dataset("amazon_polarity")
Reusing dataset amazon_polarity (/home/matthew/.cache/huggingface/datasets/amazon_polarity/amazon_polarity/3.0.0/35b3f5f426863b55dda2d5dc0da2d3714c7b0e5ba64bc4f1415ac9291ffdb234)datasetDatasetDict({
train: Dataset({
features: ['label', 'title', 'content'],
num_rows: 3600000
})
test: Dataset({
features: ['label', 'title', 'content'],
num_rows: 400000
})
})next(iter(dataset["train"])){'content': 'This sound track was beautiful! It paints the senery in your mind so well I would recomend it even to people who hate vid. game music! I have played the game Chrono Cross but out of all of the games I have ever played it has the best music! It backs away from crude keyboarding and takes a fresher step with grate guitars and soulful orchestras. It would impress anyone who cares to listen! ^_^',
'label': 1,
'title': 'Stuning even for the non-gamer'}import pandas as pd
train_df = pd.DataFrame(dataset["train"][:TRAIN_SIZE])
valid_df = pd.DataFrame(dataset["test"][:VALID_SIZE])
train_df.head()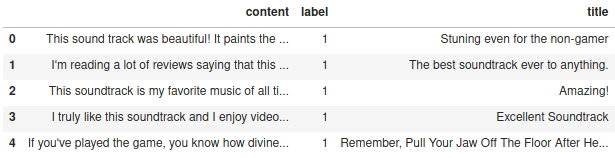
The datasets can be saved to the run. This helps in future if you need to refer to the data to establish if problematic entries were in it, or if you want to reproduce the training.
The process of writing the data to the run is to save it to a local file first and then upload it. The name of the local file will be the name of the report so if you choose to use tempfile or similar then make sure to create a temporary directory so you can name the report appropriately.
train_df.to_csv('./data/2021-02-26-train-wandb-from-notebook/train_data.csv', index=False)
valid_df.to_csv('./data/2021-02-26-train-wandb-from-notebook/valid_data.csv', index=False)
wandb.save('./data/2021-02-26-train-wandb-from-notebook/train_data.csv')
wandb.save('./data/2021-02-26-train-wandb-from-notebook/valid_data.csv')
Now we can tokenize the title and the content. Lets just take the title as the first sentence of the content.
from transformers import BertTokenizer
import torch

tokenizer = BertTokenizer.from_pretrained('bert-base-uncased')
def tokenize(row: pd.Series) -> Dict[str, torch.Tensor]:
    """ Tokenize the title and content of the row.
        Returns the attention_mask, input_ids and token_type_ids as a dict """
    title = row.title.strip()
    if not title:
        content = row.content
    elif title[-1] != ".":
        content = title + ". " + row.content
    else:
        content = title + " " + row.content

    result = tokenizer(
        content,
        return_tensors="pt",
        max_length=512,
        truncation=True,
        padding="max_length"
    )

    # Flatten the result
    return {
        key: value[0]
        for key, value in result.items()
    }

# This is a quick test - generate the tokens for the first 5 rows
# and then produce the combined dataframe
pd.concat([
    train_df[:5],
    pd.DataFrame(
        # can create a dataframe from a list of dictionaries
        train_df[:5].apply(tokenize, axis=1).tolist()
    )
], axis=1)
Now I’m going to precompute the tensors for the entire train and valid sets. This is of questionable value really as the overall dataset is very large and could be converted on demand. If the data was processed over many epochs this might edge ahead in value.
%%time

train_df = pd.concat([
    train_df,
    pd.DataFrame(
        train_df.apply(tokenize, axis=1).tolist()
    )
], axis=1)

valid_df = pd.concat([
    valid_df,
    pd.DataFrame(
        valid_df.apply(tokenize, axis=1).tolist()
    )
], axis=1)

train_df["labels"] = train_df.label.apply(torch.tensor)
valid_df["labels"] = valid_df.label.apply(torch.tensor)
CPU times: user 6.06 s, sys: 46.2 ms, total: 6.1 s
Wall time: 6.09 strain_df.head()
class DataFrameDataset(torch.utils.data.Dataset):
    def __init__(self, df):
        self.df = df[["labels", "attention_mask", "input_ids", "token_type_ids"]]

    def __getitem__(self, idx):
        return self.df.iloc[idx].to_dict()

    def __len__(self):
return len(self.df)train_dataset = DataFrameDataset(train_df)
valid_dataset = DataFrameDataset(valid_df)Now to train the model with these datasets. This is my first time training using the huggingface transformers library, so a lot of the settings I have just copied. The most important thing here is that the report_to list contains wandb, which is how the training statistics will get logged to my dashboard.
These settings result in a load of around 16G on my graphics card. I had to reduce the batch size from 32 as that exceeded the available space.
from transformers import TrainingArguments

training_args = TrainingArguments(
    report_to=["wandb"],
    output_dir="./data/2021-02-26-train-wandb-from-notebook/output",
    overwrite_output_dir=True,
    evaluation_strategy="steps",
    per_device_train_batch_size=16,
    learning_rate=5e-5,
    max_steps=MAX_STEPS,
    logging_dir="./data/2021-02-26-train-wandb-from-notebook/output",
    logging_steps=100,
    eval_steps=500,
    load_best_model_at_end=True,
    metric_for_best_model="accuracy",
    run_name=RUN_NAME
)
This is some standard model loading code. Make sure that the tokenizer / config / model all use the same model name. The error is actually expected as a custom classification head has been created, which then means the pretrained head is not used.
from transformers import AutoConfig, AutoModelForSequenceClassification

config = AutoConfig.from_pretrained('bert-base-uncased', num_labels=2)
model = AutoModelForSequenceClassification.from_pretrained(
    'bert-base-uncased', config=config
).to("cuda")
Some weights of the model checkpoint at bert-base-uncased were not used when initializing BertForSequenceClassification: ['cls.predictions.bias', 'cls.predictions.transform.dense.weight', 'cls.predictions.transform.dense.bias', 'cls.predictions.decoder.weight', 'cls.seq_relationship.weight', 'cls.seq_relationship.bias', 'cls.predictions.transform.LayerNorm.weight', 'cls.predictions.transform.LayerNorm.bias']
- This IS expected if you are initializing BertForSequenceClassification from the checkpoint of a model trained on another task or with another architecture (e.g. initializing a BertForSequenceClassification model from a BertForPreTraining model).
- This IS NOT expected if you are initializing BertForSequenceClassification from the checkpoint of a model that you expect to be exactly identical (initializing a BertForSequenceClassification model from a BertForSequenceClassification model).
Some weights of BertForSequenceClassification were not initialized from the model checkpoint at bert-base-uncased and are newly initialized: ['classifier.weight', 'classifier.bias']
You should probably TRAIN this model on a down-stream task to be able to use it for predictions and inference.Now we can have a custom metric method. I’m not sure if there is a standard metric classification. This one is nice though, and again it comes from the notebook I am copying. Well done mysterious unnamed co-worker!
from sklearn.metrics import (
    accuracy_score, precision_recall_fscore_support
)

def compute_metrics(pred):
    labels = pred.label_ids
    predictions = pred.predictions.argmax(-1)
    accuracy = accuracy_score(labels, predictions)
    precision, recall, f1_score, support = precision_recall_fscore_support(
        labels, predictions, average='macro'
    )
    return {
        'accuracy': accuracy,
        'precision': precision,
        'recall': recall,
        'f1_score': f1_score
}from transformers import Trainer
trainer = Trainer(
model=model,
args=training_args,
train_dataset=train_dataset,
eval_dataset=valid_dataset,
tokenizer=tokenizer,
compute_metrics=compute_metrics
)
trainer.train()
I think this is one of the nicest trainers I have used so far. That is some high quality output and it doesn’t take too much space.
I like the fastai trainer too, it’s just sometimes a bit magical which makes it hard to integrate with existing code. You either have a valid learner which works really well, or you don’t.
First though, lets see how we could use the model to make a prediction. It’s good to do this just to get a feel for how easy it is to use and if it’s actually any good.
dataset["test"][-1]{'content': "This DVD will be a disappointment if you get it hoping to see some substantial portion of the acts of the various comics listed on the cover. All you get here are snippets of performance, at best. The rest is just loose-leaf reminiscence about the good old days in Boston, in the early 80's, when a lot of comics were hanging out together and getting their start.It's like a frat house reunion. There's a lot of lame nostalgia. There are quite a few guffaws recalling jokes (practical and otherwise)perpetrated - back then. But you had to have been there to appreciate all the basically good ol' boy camaraderie. If you weren't actually a part of that scene, all this joshing and jostling will fall flat.If you want to actually hear some of these comics' routines - you will have to look elsewhere.",
'label': 0,
'title': 'Comedy Scene, and Not Heard'}tokens = tokenize(pd.Series(dataset["test"][-1]))
# reshape from an entry to a batch
tokens = {
key: value[None, :].cuda()
for key, value in tokens.items()
}with torch.no_grad():
output = model(**tokens)
print(f"Raw output: {output.logits}")
print(f"Predicted label: {output.logits.argmax().item()}")
print(f"Actual label: {dataset['test'][-1]['label']}")Raw output: tensor([[ 7.1538, -7.1920]], device='cuda:0')
Predicted label: 0
Actual label: 0So this spot check works, and the two classes are comfortably different. I don’t think that’s surprising as the review has words like disappointment and lame in it.
The next thing is to actually produce a confusion matrix. Since only a part of the training and test set have been used for training/validation it’s easy to come up with a test set.
test_df = pd.DataFrame(dataset["test"][-1_000:])
test_df = pd.concat([
    test_df,
    pd.DataFrame(
        test_df.apply(tokenize, axis=1).tolist()
    )
], axis=1)
test_df["labels"] = test_df.label.apply(torch.tensor)
test_df.head()
def predict(row: pd.Series) -> int:
    tokens = tokenize(row)

    # reshape from an entry to a batch
    tokens = {
        key: value[None, :].cuda()
        for key, value in tokens.items()
    }
    with torch.no_grad():
return model(**tokens).logits.argmax().item()%%time
test_df["prediction"] = test_df.apply(predict, axis=1)CPU times: user 14.9 s, sys: 0 ns, total: 14.9 s
Wall time: 14.9 sfrom sklearn.metrics import classification_report
print(classification_report(test_df["label"], test_df["prediction"])) precision recall f1-score support
0 0.95 0.94 0.95 507
1 0.94 0.95 0.95 493
accuracy 0.95 1000
macro avg 0.95 0.95 0.95 1000
weighted avg 0.95 0.95 0.95 1000
So calcuating things like precision / recall / f1 for a two class thing is a bit pointless, this really just shows how easy it is to do. The next thing would be to calculate a confusion matrix.
import plotly.figure_factory as ff
import plotly.graph_objects as go
import numpy as np
from sklearn.metrics import confusion_matrix

def conf_matrix_plot(df: pd.DataFrame):
    labels = ["negative", "positive"]
    test_labels = df["label"].tolist()
    pred_labels = df["prediction"].tolist()
    matrix = confusion_matrix(df["label"], df["prediction"])

    # make everything but the diagonal negative to mark the wrong values as incorrect
    correct_incorrect_multiplicand = np.ones(matrix.shape)
    correct_incorrect_multiplicand *= -1
    np.fill_diagonal(correct_incorrect_multiplicand, 1)

    matrix = matrix * correct_incorrect_multiplicand

    fig = ff.create_annotated_heatmap(
        z=confusion_matrix(df["label"], df["prediction"], normalize="true"),
        x=[str(f"{name} (n = {pred_labels.count(index)})") for index, name in enumerate(labels)],
        y=[str(f"{name} (n = {test_labels.count(index)})") for index, name in enumerate(labels)],
        colorscale=["red", "white", "green"],
        annotation_text=matrix,
        zmin=-1,
        zmax=1,
        showscale=True,
        colorbar=dict(
            tickvals=[-1, 1],
            ticktext=['0% Correct Labels', '100% Correct Labels']
        )
    )
    fig.update_layout(
        title_text=f"True vs. Predicted Sentiment",
        title_x=0.5,
        xaxis=go.layout.XAxis(title=go.layout.xaxis.Title(text='Predicted Sentiment')),
        yaxis=go.layout.YAxis(title=go.layout.yaxis.Title(text='True Sentiment'))
    )
return figplot = conf_matrix_plot(test_df)
plot.show()
wandb.log({"held_out_test_confusion_matrix": plot})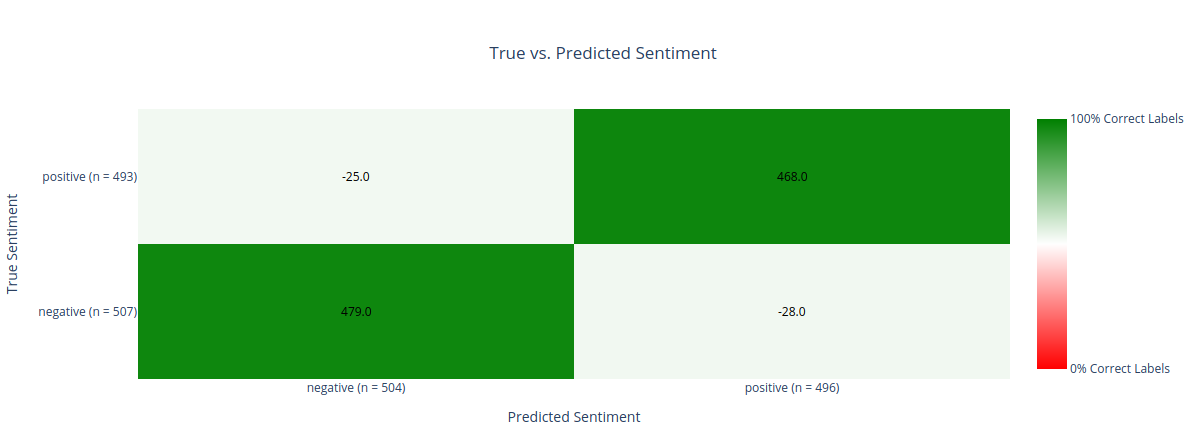
This then closes the run on Weights and Biases so you can refer to it in future. The run will include the final tranined model - in my case the BERT base uncased model is about 500mb so you should consider removing it from old runs - after all you have a finite amount of space available on Weights and Biases in the free tier.
So this has all worked and the graphs in Weights and Biases are very pretty. It even tracks the GPU utilization.
When doing this I’ve noticed that sometimes the wandb session times out. If that happens a lot of things start to break, so I had to restart the notebook. It was quite annoying.
run.finish()So this has gone pretty well. I certainly will use this in future.