Code
from pathlib import Path

MODEL_NAME = "bert-base-uncased"
BATCH_SIZE = 32

# change this to suit your machine
MODEL_RUN_FOLDER = Path("/data/blog/2021-09-12-train-using-huggingface/runs")
MODEL_RUN_FOLDER.mkdir(parents=True, exist_ok=True)I’ve been training a lot of custom huggingface models and it would be nice to break down the process and show how each stage works. This should help if you want to create your own custom model.
The process can be most easily understood by training an existing model using an existing dataset. Then we can try customizing each step of the process.
First lets define the model and batch size used. When you are working on a custom model it’s good to define things like this at the start of the notebook as it makes it easy to adjust later.
from pathlib import Path
MODEL_NAME = "bert-base-uncased"
BATCH_SIZE = 32
# change this to suit your machine
MODEL_RUN_FOLDER = Path("/data/blog/2021-09-12-train-using-huggingface/runs")
MODEL_RUN_FOLDER.mkdir(parents=True, exist_ok=True)This next cell turns on the debugger. The pdb debugger will start a REPL which accepts python code as well as some specific commands, which are documented here. The debugging session will block the execution of any further cells in the notebook, so to finish a debugging session use the c (continue) command.
%pdbAutomatic pdb calling has been turned ONUsing the debugger is especially helpful when defining a custom model or custom metrics.
Training a model requires a dataset, a model and some metrics to track performance.

We can split these tasks up by the library that provides them. First the datasets library provides datasets and the metrics that can be used to evaluate performance against them. Then the transformers library provides both the models and the training framework.
I’m aiming to show how to do this, so the task can be quite simple. The prepared datasets can be found at huggingface.co/datasets.
Let’s stick with sentiment analysis as it’s a simple task. We can use the GLUE sst2 task, which is limited to positive and negative sentiment. This is a good dataset to use as the evaluation metric is defined as part of the challenge.
The documentation for loading a dataset is here. The documentation for loading a metric is here.
import evaluate
from datasets import load_dataset

sst2_ds = load_dataset("glue", "sst2")
sst2_metric = evaluate.load("glue", "sst2")Let’s have a look at the dataset first.
sst2_dsDatasetDict({
train: Dataset({
features: ['sentence', 'label', 'idx'],
num_rows: 67349
})
validation: Dataset({
features: ['sentence', 'label', 'idx'],
num_rows: 872
})
test: Dataset({
features: ['sentence', 'label', 'idx'],
num_rows: 1821
})
})This shows that the dataset is already split into train, validation and test sets. Performing this step manually will be shown later.
sst2_ds["train"][0]{'sentence': 'hide new secretions from the parental units ',
'label': 0,
'idx': 0}sst2_ds["train"][2]{'sentence': 'that loves its characters and communicates something rather beautiful about human nature ',
'label': 1,
'idx': 2}Here you can see that a Dataset can be treated as a list of dictionaries. These two rows show that the labels are 0 for negative and 1 for positive.
How do metrics work? Let’s have a look at the one we just loaded. The core code for it is:
def _compute(self, predictions, references):
    if self.config_name == "cola":
        return {"matthews_correlation": matthews_corrcoef(references, predictions)}
    elif self.config_name == "stsb":
        return pearson_and_spearman(predictions, references)
    elif self.config_name in ["mrpc", "qqp"]:
        return acc_and_f1(predictions, references)
    elif self.config_name in ["sst2", "mnli", "mnli_mismatched", "mnli_matched", "qnli", "rte", "wnli", "hans"]:
        return {"accuracy": simple_accuracy(predictions, references)}
    else:
        raise KeyError(
            "You should supply a configuration name selected in "
            '["sst2", "mnli", "mnli_mismatched", "mnli_matched", '
            '"cola", "stsb", "mrpc", "qqp", "qnli", "rte", "wnli", "hans"]'
        )
This is a class that extends evaluate.Metric and evaluate.EvaluationModule. There is a lot of code in the EvaluationModule so if you want to look at it then I recommend going to github.
For now I am going to provide the high level view. A metric takes the model predictions and labels and returns a dictionary. The dictionary is used to create a dataframe showing the training progress. The metrics you create can be used to select the best model after training, or to allow for early stopping.
This metric is complex because it is written using the evaluate.Metric class. Alternatively you can write a simple function that takes an EvalPrediction object and returns a dictionary. The equivalent metric written in the simple form would be:
from typing import Dict
from transformers import EvalPrediction

def sst2_metric_simple(results: EvalPrediction) -> Dict[str, float]:
    # convert raw model output into predicted class
    predictions = results.predictions.argmax(axis=1)
    targets = results.label_ids
    accuracy = (predictions == targets).mean().item()
    return {"accuracy": accuracy}
The predictions and label_ids are numpy arrays.
Why does the really really complicated version exist? It’s because the entire result set is saved as the model runs the evaluation, and this can lead to memory errors. The complicated version can receive incremental results allowing memory to be released. We won’t cover the details of that in this though, not least because it doesn’t work with the huggingface trainer 😢.
The model and trainer come from the transformers library. There are a lot of different models available and the techniques I am about to show should work with most of them.
The transformers API for them is documented here in the models section. We are classifying text, so we want a ForSequenceClassification model. This example uses BertForSequenceClassification.
All of the pretrained models are at huggingface.co/models. We need to find a BERT model to load. Searching for bert gives me bert-base-uncased so lets load it:
from transformers import BertForSequenceClassification

model = BertForSequenceClassification.from_pretrained(MODEL_NAME)
Some weights of the model checkpoint at bert-base-uncased were not used when initializing BertForSequenceClassification: ['cls.predictions.transform.dense.weight', 'cls.seq_relationship.bias', 'cls.seq_relationship.weight', 'cls.predictions.transform.dense.bias', 'cls.predictions.decoder.weight', 'cls.predictions.transform.LayerNorm.bias', 'cls.predictions.bias', 'cls.predictions.transform.LayerNorm.weight']
- This IS expected if you are initializing BertForSequenceClassification from the checkpoint of a model trained on another task or with another architecture (e.g. initializing a BertForSequenceClassification model from a BertForPreTraining model).
- This IS NOT expected if you are initializing BertForSequenceClassification from the checkpoint of a model that you expect to be exactly identical (initializing a BertForSequenceClassification model from a BertForSequenceClassification model).
Some weights of BertForSequenceClassification were not initialized from the model checkpoint at bert-base-uncased and are newly initialized: ['classifier.weight', 'classifier.bias']
You should probably TRAIN this model on a down-stream task to be able to use it for predictions and inference.It’s quite normal to see some complaints when loading this from huggingface. This is because the model is made of a trained body and an untrained head.

We can see this by reviewing the forward method of the model:
def forward(
        self,
        input_ids=None,
        attention_mask=None,
        token_type_ids=None,
        position_ids=None,
        head_mask=None,
        inputs_embeds=None,
        labels=None,
        output_attentions=None,
        output_hidden_states=None,
        return_dict=None,
    ):
        # minor preparation ...

        # this is where the body output is calculated
        outputs = self.bert(
            input_ids,
            attention_mask=attention_mask,
            token_type_ids=token_type_ids,
            position_ids=position_ids,
            head_mask=head_mask,
            inputs_embeds=inputs_embeds,
            output_attentions=output_attentions,
            output_hidden_states=output_hidden_states,
            return_dict=return_dict,
        )

        # this is the classification head
        pooled_output = outputs[1]
        pooled_output = self.dropout(pooled_output)
        logits = self.classifier(pooled_output)

        # ... loss calculation

        return SequenceClassifierOutput(
            loss=loss,
            logits=logits,
            hidden_states=outputs.hidden_states,
            attentions=outputs.attentions,
        )
The interesting part of this is:
outputs = self.bert(
    input_ids,
    attention_mask=attention_mask,
    token_type_ids=token_type_ids,
    position_ids=position_ids,
    head_mask=head_mask,
    inputs_embeds=inputs_embeds,
    output_attentions=output_attentions,
    output_hidden_states=output_hidden_states,
    return_dict=return_dict,
)

pooled_output = outputs[1]
pooled_output = self.dropout(pooled_output)
logits = self.classifier(pooled_output)
Here you can see the input being passed to the transformer body (self.bert), then the output of that is passed through the classification head self.classifier. These logits are the final output of the model.
When we create a custom model we almost always keep the same body and just change the head.
The input to the model is tokenized text. Each model has a specific tokenizer associated with it. So when loading the tokenizer we must use the same model name:
from transformers import AutoTokenizer

# make sure the pretrained name matches the model!
tokenizer = AutoTokenizer.from_pretrained(MODEL_NAME)
If there are complaints when loading the tokenizer then you have a problem. This training process does not involve creating a new tokenizer, so the tokenizer should be complete and valid.
To encode text using the tokenizer just call it:
tokenizer("Hello World"){'input_ids': [101, 7592, 2088, 102], 'token_type_ids': [0, 0, 0, 0], 'attention_mask': [1, 1, 1, 1]}The interesting part here is the input_ids. It’s good to keep the values as a list of integers so that the huggingface trainer can reform them as required. The attention_mask will be generated by the trainer, and token_type_ids are not interesting for this task.
To decode the text you can call tokenizer.decode:
tokenizer.decode([101, 7592, 2088, 102])'[CLS] hello world [SEP]'This is the tokenizer for the uncased model, so it has lowercased the text. It also adds special tokens that let the model work with the boundaries of the utterance.
With all of these parts we can train the model.
from pathlib import Path
from transformers import Trainer, TrainingArguments

training_args = TrainingArguments(
    per_device_train_batch_size=BATCH_SIZE,
    per_device_eval_batch_size=BATCH_SIZE,
    learning_rate=5e-5,
    warmup_ratio=0.06,

    report_to=[], # you'd use wandb for weights and biases

    # very short as this is a demonstration
    evaluation_strategy="steps",
    max_steps=50,
    logging_steps=10,
    eval_steps=10,

    load_best_model_at_end=True,
    metric_for_best_model="accuracy",
    greater_is_better=True,

    no_cuda=True, # let you run it on any machine

    # output_dir is compulsory
    logging_dir=MODEL_RUN_FOLDER / "output",
    output_dir=MODEL_RUN_FOLDER / "output",
    overwrite_output_dir=True,
)

trainer = Trainer(
    model=model,
    args=training_args,
    train_dataset=sst2_ds["train"],
    eval_dataset=sst2_ds["validation"],
    tokenizer=tokenizer,
    compute_metrics=sst2_metric,
)

trainer.train()
max_steps is given, it will override any value given in num_train_epochs
The following columns in the training set don't have a corresponding argument in `BertForSequenceClassification.forward` and have been ignored: sentence, idx.
***** Running training *****
Num examples = 67349
Num Epochs = 1
Instantaneous batch size per device = 32
Total train batch size (w. parallel, distributed & accumulation) = 32
Gradient Accumulation steps = 1
Total optimization steps = 50ValueError: You should supply an encoding or a list of encodings to this method that includes input_ids, but you provided ['label']I’m showing this error as it’s quite important to be aware of it. The problem here is that the data has not been tokenized, and the Trainer is expecting tokenized input.
The input to the model is the input_ids field. If these are lists of integers then the trainer will correctly form these into batches, creating the appropriate attention mask.
However if you use tensors then it will attempt to concatenate them, which only works if they are all the same size. Making them the same size would also require creating the attention_mask as you would almost certainly be padding some inputs.
It’s much easier to create the input_ids as a list of integers.
from typing import *

def encode(row: Dict[str, Any]) -> List[int]:
    return tokenizer(
        row["sentence"],
        return_attention_mask=False,
        return_token_type_ids=False
    )

encoded_sst2_ds = sst2_ds.map(encode)encoded_sst2_dsDatasetDict({
train: Dataset({
features: ['idx', 'label', 'sentence', 'input_ids'],
num_rows: 67349
})
validation: Dataset({
features: ['idx', 'label', 'sentence', 'input_ids'],
num_rows: 872
})
test: Dataset({
features: ['idx', 'label', 'sentence', 'input_ids'],
num_rows: 1821
})
})encoded_sst2_ds["train"][0]{'idx': 0,
'label': 0,
'sentence': 'hide new secretions from the parental units ',
'input_ids': [101, 5342, 2047, 3595, 8496, 2013, 1996, 18643, 3197, 102]}As you can see encoding the dataset applies the function to all rows in the different splits. The map function is a bit odd - if you list the columns to transform then it will drop the others. Calling map produces a new dataset, leaving the original unaltered.
We can drop everything except the label and the input_ids now.
encoded_sst2_ds = encoded_sst2_ds.remove_columns(["idx", "sentence"])Now we can train a model with this dataset. The training configuration here is identical to before.
from pathlib import Path
from transformers import Trainer, TrainingArguments, EvalPrediction

def compute_metrics(results: EvalPrediction) -> Dict[str, Any]:
    return sst2_metric.compute(
        # convert raw model output into predicted class
        predictions=results.predictions.argmax(axis=1),
        references=results.label_ids
    )

training_args = TrainingArguments(
    per_device_train_batch_size=BATCH_SIZE,
    per_device_eval_batch_size=BATCH_SIZE,
    learning_rate=5e-5,
    warmup_ratio=0.06,

    report_to=[], # you'd use wandb for weights and biases

    # very short as this is a demonstration
    evaluation_strategy="steps",
    max_steps=50,
    logging_steps=10,
    eval_steps=10,

    load_best_model_at_end=True,
    metric_for_best_model="accuracy",
    greater_is_better=True,

    no_cuda=True, # let you run it on any machine

    # output_dir is compulsory
    logging_dir=MODEL_RUN_FOLDER / "output",
    output_dir=MODEL_RUN_FOLDER / "output",
    overwrite_output_dir=True,
)

trainer = Trainer(
    model=model,
    args=training_args,
    train_dataset=encoded_sst2_ds["train"],
    eval_dataset=encoded_sst2_ds["validation"],
    tokenizer=tokenizer,
    compute_metrics=compute_metrics,
)

trainer.train()
PyTorch: setting up devices
max_steps is given, it will override any value given in num_train_epochs
***** Running training *****
Num examples = 67349
Num Epochs = 1
Instantaneous batch size per device = 32
Total train batch size (w. parallel, distributed & accumulation) = 32
Gradient Accumulation steps = 1
Total optimization steps = 50| Step | Training Loss | Validation Loss | Accuracy |
|---|---|---|---|
| 10 | 0.239100 | 0.338536 | 0.871560 |
| 20 | 0.155000 | 0.359864 | 0.861239 |
| 30 | 0.159900 | 0.394075 | 0.857798 |
| 40 | 0.219400 | 0.335876 | 0.869266 |
| 50 | 0.371100 | 0.313348 | 0.879587 |
***** Running Evaluation *****
  Num examples = 872
  Batch size = 32
Saving model checkpoint to /data/blog/2021-09-12-train-using-huggingface/runs/output/checkpoint-10
Configuration saved in /data/blog/2021-09-12-train-using-huggingface/runs/output/checkpoint-10/config.json
Model weights saved in /data/blog/2021-09-12-train-using-huggingface/runs/output/checkpoint-10/pytorch_model.bin
tokenizer config file saved in /data/blog/2021-09-12-train-using-huggingface/runs/output/checkpoint-10/tokenizer_config.json
Special tokens file saved in /data/blog/2021-09-12-train-using-huggingface/runs/output/checkpoint-10/special_tokens_map.json
***** Running Evaluation *****
  Num examples = 872
  Batch size = 32
Saving model checkpoint to /data/blog/2021-09-12-train-using-huggingface/runs/output/checkpoint-20
Configuration saved in /data/blog/2021-09-12-train-using-huggingface/runs/output/checkpoint-20/config.json
Model weights saved in /data/blog/2021-09-12-train-using-huggingface/runs/output/checkpoint-20/pytorch_model.bin
tokenizer config file saved in /data/blog/2021-09-12-train-using-huggingface/runs/output/checkpoint-20/tokenizer_config.json
Special tokens file saved in /data/blog/2021-09-12-train-using-huggingface/runs/output/checkpoint-20/special_tokens_map.json
***** Running Evaluation *****
  Num examples = 872
  Batch size = 32
Saving model checkpoint to /data/blog/2021-09-12-train-using-huggingface/runs/output/checkpoint-30
Configuration saved in /data/blog/2021-09-12-train-using-huggingface/runs/output/checkpoint-30/config.json
Model weights saved in /data/blog/2021-09-12-train-using-huggingface/runs/output/checkpoint-30/pytorch_model.bin
tokenizer config file saved in /data/blog/2021-09-12-train-using-huggingface/runs/output/checkpoint-30/tokenizer_config.json
Special tokens file saved in /data/blog/2021-09-12-train-using-huggingface/runs/output/checkpoint-30/special_tokens_map.json
***** Running Evaluation *****
  Num examples = 872
  Batch size = 32
Saving model checkpoint to /data/blog/2021-09-12-train-using-huggingface/runs/output/checkpoint-40
Configuration saved in /data/blog/2021-09-12-train-using-huggingface/runs/output/checkpoint-40/config.json
Model weights saved in /data/blog/2021-09-12-train-using-huggingface/runs/output/checkpoint-40/pytorch_model.bin
tokenizer config file saved in /data/blog/2021-09-12-train-using-huggingface/runs/output/checkpoint-40/tokenizer_config.json
Special tokens file saved in /data/blog/2021-09-12-train-using-huggingface/runs/output/checkpoint-40/special_tokens_map.json
***** Running Evaluation *****
  Num examples = 872
  Batch size = 32
Saving model checkpoint to /data/blog/2021-09-12-train-using-huggingface/runs/output/checkpoint-50
Configuration saved in /data/blog/2021-09-12-train-using-huggingface/runs/output/checkpoint-50/config.json
Model weights saved in /data/blog/2021-09-12-train-using-huggingface/runs/output/checkpoint-50/pytorch_model.bin
tokenizer config file saved in /data/blog/2021-09-12-train-using-huggingface/runs/output/checkpoint-50/tokenizer_config.json
Special tokens file saved in /data/blog/2021-09-12-train-using-huggingface/runs/output/checkpoint-50/special_tokens_map.json


Training completed. Do not forget to share your model on huggingface.co/models =)


Loading best model from /data/blog/2021-09-12-train-using-huggingface/runs/output/checkpoint-50 (score: 0.8795871559633027).
TrainOutput(global_step=50, training_loss=0.22888969659805297, metrics={'train_runtime': 212.883, 'train_samples_per_second': 7.516, 'train_steps_per_second': 0.235, 'total_flos': 31951548785280.0, 'train_loss': 0.22888969659805297, 'epoch': 0.02})This compute_metrics code:
def compute_metrics(results: EvalPrediction) -> Dict[str, Any]:
    return sst2_metric.compute(
        predictions=results.predictions.argmax(axis=1),
        references=results.label_ids
    )
shows that the GLUE datasets.Metric object isn’t currently designed for use with the huggingface trainer. There are a few rough edges like this between the two. I’m hopeful that the integration between the two will improve in time as it would be nice for the trainer to use the incremental metric calculation - I’ve had memory issues with large validation datasets in the past and using incremental metric calculation would address these. For now if you run into memory issues when evaluating training, you can either reduce your validation dataset size or use the eval_accumulation_steps option of the TrainingArguments.
eval_accumulation_steps (int, optional) — Number of predictions steps to accumulate the output tensors for, before moving the results to the CPU. If left unset, the whole predictions are accumulated on GPU/TPU before being moved to the CPU (faster but requires more memory).
Let’s see how this would be with the rewritten form of the metric:
from typing import Dict
from transformers import EvalPrediction

def sst2_metric_simple(results: EvalPrediction) -> Dict[str, float]:
    # convert raw model output into predicted class
    predictions = results.predictions.argmax(axis=1)
    targets = results.label_ids
    accuracy = (predictions == targets).mean().item()
return {"accuracy": accuracy}from transformers import BertForSequenceClassification
# reload the model to start from scratch again
model = BertForSequenceClassification.from_pretrained(MODEL_NAME)from pathlib import Path
from transformers import Trainer, TrainingArguments, EvalPrediction
training_args = TrainingArguments(
per_device_train_batch_size=BATCH_SIZE,
per_device_eval_batch_size=BATCH_SIZE,
learning_rate=5e-5,
warmup_ratio=0.06,
report_to=[], # you'd use wandb for weights and biases
# very short as this is a demonstration
evaluation_strategy="steps",
max_steps=50,
logging_steps=10,
eval_steps=10,
load_best_model_at_end=True,
metric_for_best_model="accuracy",
greater_is_better=True,
no_cuda=True, # let you run it on any machine
# output_dir is compulsory
logging_dir=MODEL_RUN_FOLDER / "output",
output_dir=MODEL_RUN_FOLDER / "output",
overwrite_output_dir=True,
)
trainer = Trainer(
model=model,
args=training_args,
train_dataset=encoded_sst2_ds["train"],
eval_dataset=encoded_sst2_ds["validation"],
tokenizer=tokenizer,
compute_metrics=sst2_metric_simple,
)
trainer.train()PyTorch: setting up devices
max_steps is given, it will override any value given in num_train_epochs
***** Running training *****
Num examples = 67349
Num Epochs = 1
Instantaneous batch size per device = 32
Total train batch size (w. parallel, distributed & accumulation) = 32
Gradient Accumulation steps = 1
Total optimization steps = 50| Step | Training Loss | Validation Loss | Accuracy |
|---|---|---|---|
| 10 | 0.742300 | 0.614478 | 0.731651 |
| 20 | 0.577600 | 0.473612 | 0.840596 |
| 30 | 0.388400 | 0.352919 | 0.860092 |
| 40 | 0.330900 | 0.341197 | 0.865826 |
| 50 | 0.415000 | 0.322916 | 0.875000 |
***** Running Evaluation *****
  Num examples = 872
  Batch size = 32
Saving model checkpoint to /data/blog/2021-09-12-train-using-huggingface/runs/output/checkpoint-10
Configuration saved in /data/blog/2021-09-12-train-using-huggingface/runs/output/checkpoint-10/config.json
Model weights saved in /data/blog/2021-09-12-train-using-huggingface/runs/output/checkpoint-10/pytorch_model.bin
tokenizer config file saved in /data/blog/2021-09-12-train-using-huggingface/runs/output/checkpoint-10/tokenizer_config.json
Special tokens file saved in /data/blog/2021-09-12-train-using-huggingface/runs/output/checkpoint-10/special_tokens_map.json
***** Running Evaluation *****
  Num examples = 872
  Batch size = 32
Saving model checkpoint to /data/blog/2021-09-12-train-using-huggingface/runs/output/checkpoint-20
Configuration saved in /data/blog/2021-09-12-train-using-huggingface/runs/output/checkpoint-20/config.json
Model weights saved in /data/blog/2021-09-12-train-using-huggingface/runs/output/checkpoint-20/pytorch_model.bin
tokenizer config file saved in /data/blog/2021-09-12-train-using-huggingface/runs/output/checkpoint-20/tokenizer_config.json
Special tokens file saved in /data/blog/2021-09-12-train-using-huggingface/runs/output/checkpoint-20/special_tokens_map.json
***** Running Evaluation *****
  Num examples = 872
  Batch size = 32
Saving model checkpoint to /data/blog/2021-09-12-train-using-huggingface/runs/output/checkpoint-30
Configuration saved in /data/blog/2021-09-12-train-using-huggingface/runs/output/checkpoint-30/config.json
Model weights saved in /data/blog/2021-09-12-train-using-huggingface/runs/output/checkpoint-30/pytorch_model.bin
tokenizer config file saved in /data/blog/2021-09-12-train-using-huggingface/runs/output/checkpoint-30/tokenizer_config.json
Special tokens file saved in /data/blog/2021-09-12-train-using-huggingface/runs/output/checkpoint-30/special_tokens_map.json
***** Running Evaluation *****
  Num examples = 872
  Batch size = 32
Saving model checkpoint to /data/blog/2021-09-12-train-using-huggingface/runs/output/checkpoint-40
Configuration saved in /data/blog/2021-09-12-train-using-huggingface/runs/output/checkpoint-40/config.json
Model weights saved in /data/blog/2021-09-12-train-using-huggingface/runs/output/checkpoint-40/pytorch_model.bin
tokenizer config file saved in /data/blog/2021-09-12-train-using-huggingface/runs/output/checkpoint-40/tokenizer_config.json
Special tokens file saved in /data/blog/2021-09-12-train-using-huggingface/runs/output/checkpoint-40/special_tokens_map.json
***** Running Evaluation *****
  Num examples = 872
  Batch size = 32
Saving model checkpoint to /data/blog/2021-09-12-train-using-huggingface/runs/output/checkpoint-50
Configuration saved in /data/blog/2021-09-12-train-using-huggingface/runs/output/checkpoint-50/config.json
Model weights saved in /data/blog/2021-09-12-train-using-huggingface/runs/output/checkpoint-50/pytorch_model.bin
tokenizer config file saved in /data/blog/2021-09-12-train-using-huggingface/runs/output/checkpoint-50/tokenizer_config.json
Special tokens file saved in /data/blog/2021-09-12-train-using-huggingface/runs/output/checkpoint-50/special_tokens_map.json


Training completed. Do not forget to share your model on huggingface.co/models =)


Loading best model from /data/blog/2021-09-12-train-using-huggingface/runs/output/checkpoint-50 (score: 0.875).
TrainOutput(global_step=50, training_loss=0.49083054065704346, metrics={'train_runtime': 214.6809, 'train_samples_per_second': 7.453, 'train_steps_per_second': 0.233, 'total_flos': 31951548785280.0, 'train_loss': 0.49083054065704346, 'epoch': 0.02})The metrics from datasets don’t add much as you need a wrapper around them anyway. Because of this I usually write my own metric.
Now we can try replacing each of these parts with a customized version.
We can start with a custom dataset that we load through pandas. This shows how to load any data as we all use pandas quite a lot.
This data comes from this github repo. It’s just a csv with text and sentiment labels.
import pandas as pd

# about 80 mb
df = pd.read_csv(
    "https://raw.githubusercontent.com/vineetdhanawat/twitter-sentiment-analysis/master/datasets/Sentiment%20Analysis%20Dataset.csv",
    encoding="latin1",
    index_col="ItemID",
)
df| Sentiment | SentimentText | |
|---|---|---|
| ItemID | ||
| 1 | 0 | is so sad for my APL frie... |
| 2 | 0 | I missed the New Moon trail... |
| 3 | 1 | omg its already 7:30 :O |
| 4 | 0 | .. Omgaga. Im sooo im gunna CRy. I'... |
| 5 | 0 | i think mi bf is cheating on me!!! ... |
| ... | ... | ... |
| 1048584 | 0 | Missing my fiancee sooo badly!!! I love you b... |
| 1048585 | 0 | missing my friend |
| 1048586 | 0 | Missing my friend and my cousin. Two months pa... |
| 1048587 | 0 | missing my friends! |
| 1048588 | 0 | Missing my friends!! |
1048575 rows × 2 columns
df.Sentiment.value_counts()1 554470
0 494105
Name: Sentiment, dtype: int64For this demo we only need a small amount of data - we will continue with 50 steps and a batch size of 32. We don’t need more than that.
slim_df = (
    pd.concat([
        df[df.Sentiment == 0].sample(n=1000),
        df[df.Sentiment == 1].sample(n=1000),
    ])
    .sample(frac=1) # shuffle
    .reset_index(drop=True)
)
slim_df| Sentiment | SentimentText | |
|---|---|---|
| 0 | 0 | @resiliencyyy now i dont even fl like going an... |
| 1 | 1 | @crazzzier yeah! haha! ready n c chie eh |
| 2 | 1 | Hehe he's cute! We've got him until Friday ht... |
| 3 | 1 | Hey @KaizerAllen! How are you? Sure. Lez talk ... |
| 4 | 1 | I'm on "Cloud Nine" right now |
| ... | ... | ... |
| 1995 | 0 | @mollymauk This content is unavailable to you.... |
| 1996 | 0 | at westmead childrens emergency hosp at strt o... |
| 1997 | 1 | @dmentedboy thank you. But damnit I'm wide a... |
| 1998 | 0 | @Switcheh <3 It seems I can't receive or se... |
| 1999 | 0 | @30SECONDSTOMARS some good suggestions about h... |
2000 rows × 2 columns
You can create a datasets.Dataset from any pandas dataframe by using the datasets.Dataset.from_pandas method.
import datasets

ds = datasets.Dataset.from_pandas(slim_df)
ds
Dataset({
features: ['Sentiment', 'SentimentText'],
num_rows: 2000
})Now we just need to tokenize the text and rename the Sentiment column. You could do this with pandas before creating the dataset if you wanted.
from typing import *
from transformers import AutoTokenizer

tokenizer = AutoTokenizer.from_pretrained(MODEL_NAME)

def encode(row: Dict[str, Any]) -> List[int]:
    return tokenizer(
        row["SentimentText"],
        return_attention_mask=False,
        return_token_type_ids=False
    )

encoded_ds = ds.map(encode)encoded_ds = encoded_ds.rename_column("Sentiment", "label")
encoded_ds = encoded_ds.remove_columns("SentimentText")
encoded_dsDataset({
features: ['label', 'input_ids'],
num_rows: 2000
})We have to split it into test and train, which is easy enough. After this we will have something extremely similar to what we loaded from the GLUE benchmark.
split_ds = encoded_ds.train_test_split(test_size=200)
split_ds
DatasetDict({
train: Dataset({
features: ['label', 'input_ids'],
num_rows: 1800
})
test: Dataset({
features: ['label', 'input_ids'],
num_rows: 200
})
})That is how you can create your own dataset. The dataset class has a caching mechanism so if you run the same transformation over the same dataset then it can use the cache.
In some edge cases the creation of this cache can take a significant amount of time, so if the dataset preprocessing is too slow try moving your transformation to pandas. The cache creation can be slow if saving the data takes a long time or if the transformation function you use is difficult to serialize.
I’m going to define the custom metric here to keep the order the same. The basic accuracy metric is fine, however it is quite nice to be able to provide precision and recall figures. We can easily write such a function by extending the compute metrics method we defined before. (This metric is provided in the evaluation library metrics as f1, accuracy and precision which can be combined using evaluate.combine).
Remember that the predictions are the raw model outputs, so we will have two values and the predicted class is whichever is bigger.
from typing import Dict
from transformers import EvalPrediction
import numpy as np
from sklearn.metrics import accuracy_score, precision_recall_fscore_support

def custom_metrics(results: EvalPrediction) -> Dict[str, float]:
    # convert raw model output into predicted class
    predictions = results.predictions.argmax(axis=1)
    targets = results.label_ids

    accuracy = accuracy_score(y_true=targets, y_pred=predictions)
    (
        (negative_precision, positive_precision),
        (negative_recall,    positive_recall),
        (negative_fscore,    positive_fscore),
        (negative_support,   positive_support),
    ) = precision_recall_fscore_support(
        y_true=targets,
        y_pred=predictions,

        # you can often get no predictions for a class
        # providing this argument prevents a lot of warnings
        zero_division=0.,
    )

    return {
        "accuracy": accuracy,

        "negative_precision": negative_precision,
        "negative_recall":    negative_recall,
        "negative_fscore":    negative_fscore,
        "negative_support":   negative_support,

        "positive_precision": positive_precision,
        "positive_recall":    positive_recall,
        "positive_fscore":    positive_fscore,
        "positive_support":   positive_support,
    }
Remember that the EvalPrediction is just the predictions and labels and writing a metric becomes very easy.
This gets a bit more involved. You’ve already seen that there are different models for different tasks - we used a BertForSequenceClassification model earlier to classify the text. There are many other models based on Bert such as BertForQuestionAnswering, BertForTokenClassification, BertForNextSentencePrediction…
Each of these distinct model types can change the output. To allow the trainer to correctly train any of these models a model is responsible for calculating it’s own loss. If you pass the labels to a model alongside the input then the output will include the loss based on the distance to those labels.

If you make a model that does this then it will train correctly.
When you look at an actual model it frequently does a lot more than this, and it can be helpful to provide additional details to the caller. For example the BertForSequenceClassification.forward method has the following behaviour:
def forward(
    self,
    # lots of parameters
):
    return_dict = return_dict if return_dict is not None else self.config.use_return_dict

    outputs = self.bert(
        # lots of arguments
    )
    pooled_output = outputs[1]
    pooled_output = self.dropout(pooled_output)
    logits = self.classifier(pooled_output)

    loss = None
    if labels is not None:
        # calculate loss
    if not return_dict:
        output = (logits,) + outputs[2:]
        return ((loss,) + output) if loss is not None else output

    return SequenceClassifierOutput(
        loss=loss,
        logits=logits,
        hidden_states=outputs.hidden_states,
        attentions=outputs.attentions,
)The aim here is not to create something cutting edge, it’s to understand it. Let’s start with the simplest thing. The core behaviour of these NLP models is to pass the input through a transformer stack and then pass it through the task specific head. We can see that in the code snippet above here:
# the transformer stack
outputs = self.bert(
    # lots of arguments
)

# the classifier
pooled_output = outputs[1]
pooled_output = self.dropout(pooled_output)
logits = self.classifier(pooled_output)
We can just duplicate that and build upon the base bert model.
from typing import *
from transformers import BertModel, BertPreTrainedModel, BertConfig
import torch
from torch import nn

class BertSimpleClassifier(BertPreTrainedModel):

    def __init__(self, config: BertConfig) -> None:
        super().__init__(config)
        # copied this bit from BertForSequenceClassification
        # often the transformer is created by a parent class
        self.config = config
        self.bert = BertModel(config)

        self.classifier = nn.Linear(
            in_features=config.hidden_size,
            out_features=2,
            bias=False
        )

    def forward(
        self,
        input_ids: torch.Tensor,
        attention_mask: Optional[torch.Tensor] = None,
        labels: Optional[torch.Tensor] = None
    ) -> Tuple[torch.Tensor, ...]:
        output = self.bert(
            input_ids=input_ids,
            attention_mask=attention_mask
        )
        logits = self.classifier(output[1])

        if labels is not None:
            # cross entropy is suitable for single class classifiers
            # it works as you expect when the input is [N, classes] floats and the target is [N] integers
            # so we reshape the input slightly
            # cross entropy applies softmax for you
            loss = torch.nn.functional.cross_entropy(
                logits.reshape(-1, 2),
                labels.flatten()
            )
            return (loss, logits)
        return (logits,) # must be a tuple!
We can create a pretrained version of our custom model by using the from_pretrained method:
model = BertSimpleClassifier.from_pretrained(MODEL_NAME) # this works!Some weights of the model checkpoint at bert-base-uncased were not used when initializing BertSimpleClassifier: ['cls.predictions.transform.LayerNorm.bias', 'cls.predictions.transform.dense.weight', 'cls.seq_relationship.bias', 'cls.predictions.transform.LayerNorm.weight', 'cls.predictions.bias', 'cls.predictions.transform.dense.bias', 'cls.predictions.decoder.weight', 'cls.seq_relationship.weight']
- This IS expected if you are initializing BertSimpleClassifier from the checkpoint of a model trained on another task or with another architecture (e.g. initializing a BertForSequenceClassification model from a BertForPreTraining model).
- This IS NOT expected if you are initializing BertSimpleClassifier from the checkpoint of a model that you expect to be exactly identical (initializing a BertForSequenceClassification model from a BertForSequenceClassification model).
Some weights of BertSimpleClassifier were not initialized from the model checkpoint at bert-base-uncased and are newly initialized: ['classifier.weight']
You should probably TRAIN this model on a down-stream task to be able to use it for predictions and inference.It’s worth stopping to cover how the from_pretrained method works, as it is quite simple and it works with our custom model. The method first loads the configuration for the model name. It then passes this configuration to the constructor of the class you call from_pretrained on (BertSimpleClassifier in this case). Finally it loads the weights from the files stored on S3 into the created model.
To get this to work with your custom model the __init__ method must take a config object as it’s only parameter and it must call the superclass constructor with it:
def __init__(self, config) -> None:
    super().__init__(config)
If you want to provide custom parameters to your constructor then do it through the configuration. The configuration is saved with the model weights so faithfully reproducing your model requires putting all configuration options in the config object.
When writing your own model it’s a good idea to quickly test that it works correctly with the training loop and the metrics. Let’s do that.
from pathlib import Path
from transformers import Trainer, TrainingArguments, EvalPrediction

training_args = TrainingArguments(
    per_device_train_batch_size=BATCH_SIZE,
    per_device_eval_batch_size=BATCH_SIZE,
    learning_rate=5e-5,
    warmup_ratio=0.06,

    report_to=[], # you'd use wandb for weights and biases

    # even shorter as this is testing the model and metrics
    evaluation_strategy="steps",
    max_steps=10,
    logging_steps=5,
    eval_steps=5,

    load_best_model_at_end=True,
    metric_for_best_model="accuracy",
    greater_is_better=True,

    no_cuda=True, # let you run it on any machine

    # output_dir is compulsory
    logging_dir=MODEL_RUN_FOLDER / "output",
    output_dir=MODEL_RUN_FOLDER / "output",
    overwrite_output_dir=True,
)

trainer = Trainer(
    model=model,
    args=training_args,
    train_dataset=split_ds["train"],
    eval_dataset=split_ds["test"],
    tokenizer=tokenizer,
    compute_metrics=custom_metrics,
)

trainer.train()
max_steps is given, it will override any value given in num_train_epochs
***** Running training *****
Num examples = 1800
Num Epochs = 1
Instantaneous batch size per device = 32
Total train batch size (w. parallel, distributed & accumulation) = 32
Gradient Accumulation steps = 1
Total optimization steps = 10| Step | Training Loss | Validation Loss | Accuracy | Negative Precision | Negative Recall | Negative Fscore | Negative Support | Positive Precision | Positive Recall | Positive Fscore | Positive Support |
|---|---|---|---|---|---|---|---|---|---|---|---|
| 5 | 0.683700 | 0.657098 | 0.675000 | 0.654867 | 0.740000 | 0.694836 | 100 | 0.701149 | 0.610000 | 0.652406 | 100 |
| 10 | 0.660300 | 0.644941 | 0.655000 | 0.613139 | 0.840000 | 0.708861 | 100 | 0.746032 | 0.470000 | 0.576687 | 100 |
***** Running Evaluation *****
  Num examples = 200
  Batch size = 32
Saving model checkpoint to /data/blog/2021-09-12-train-using-huggingface/runs/output/checkpoint-5
Configuration saved in /data/blog/2021-09-12-train-using-huggingface/runs/output/checkpoint-5/config.json
Model weights saved in /data/blog/2021-09-12-train-using-huggingface/runs/output/checkpoint-5/pytorch_model.bin
tokenizer config file saved in /data/blog/2021-09-12-train-using-huggingface/runs/output/checkpoint-5/tokenizer_config.json
Special tokens file saved in /data/blog/2021-09-12-train-using-huggingface/runs/output/checkpoint-5/special_tokens_map.json
***** Running Evaluation *****
  Num examples = 200
  Batch size = 32
Saving model checkpoint to /data/blog/2021-09-12-train-using-huggingface/runs/output/checkpoint-10
Configuration saved in /data/blog/2021-09-12-train-using-huggingface/runs/output/checkpoint-10/config.json
Model weights saved in /data/blog/2021-09-12-train-using-huggingface/runs/output/checkpoint-10/pytorch_model.bin
tokenizer config file saved in /data/blog/2021-09-12-train-using-huggingface/runs/output/checkpoint-10/tokenizer_config.json
Special tokens file saved in /data/blog/2021-09-12-train-using-huggingface/runs/output/checkpoint-10/special_tokens_map.json


Training completed. Do not forget to share your model on huggingface.co/models =)


Loading best model from /data/blog/2021-09-12-train-using-huggingface/runs/output/checkpoint-5 (score: 0.675).
TrainOutput(global_step=10, training_loss=0.6720160722732544, metrics={'train_runtime': 32.0871, 'train_samples_per_second': 9.973, 'train_steps_per_second': 0.312, 'total_flos': 7350664937472.0, 'train_loss': 0.6720160722732544, 'epoch': 0.18})This worked. It produced nice metrics. It’s a bit early to say if this is better than blind chance, I feel like this would train just fine though.
If you’re anything like me then you didn’t get to this point with your first try. You probably made a typo or something. The cell magic %pdb command at the start of this post is very useful. When you hit an error it produces an interactive debugger. In this you can execute python commands to inspect the current state of variables and find out why the code is broken. My error was that the logits were the classified outputs while the output came from the underlying bert model - and I was returning the wrong one.
Using a debugger is something that I do not do often enough. It can really help.
There are many loss functions available in pytorch. Choosing the correct loss function is the single largest difference you can make to the performance of your model. A well chosen loss function lets the model train quickly and become good at the task.
The way that you measure the quality of your model is an approximate loss function. Metrics are a poor loss function because they tend to turn predictions into discrete choices. This discretization means that the model cannot measure partial improvement that does not change the final output. As a first approximation taking a loss function that is very similar to your core metric is a good choice.
To help with this here are some appropriate loss functions to use for different tasks:
This is when you have to label some text with a single label. An example of this is sentiment classification.
The metrics for this might be overall accuracy, as well as the per class precision/recall/f1. The Cross Entropy loss function measures the degree to which your model confidently predicts the correct class.
You should not apply softmax to the output of the model before passing it to this loss function.
This is when you want to label some text with zero or more labels. An example of this is assigining topics to text.
The metrics for this might be per label accuracy. The Binary Cross Entropy loss function treats each label as an independent prediction and measures how well your model does.
It’s best to use the with logits loss function without applying sigmoid to the model output as this is more numerically stable.
This is when you want to provide a continuous output or score for the text. An example of this is measuring the grammaticality of the text.
The metrics for this might be mean absolute error. The mean squared error loss function works well for this as it punishes extremely wrong answers and is more gentle with approximately correct answers.
If you are mapping your outputs (e.g. using sigmoid) then you should apply this before using the loss function.
This is when you want to measure the similarity or difference between text pairs. An example of this is matching queries to documents.
The metrics for this might be the number of matching documents in the top 10 most similar documents. The Cosine Embedding loss function uses cosine similarity to move the output embeddings closer together for matching queries and documents, and separate the embeddings for non-matching queries and documents.
Cosine similarity does have a problem that it only considers the angle of the vectors. It is scale invariant so points that it considers very similar may be quite distant from each other.
If this is a problem then you should create a custom loss function that can work with the euclidean distance. You can calculate the euclidean distance with torch.cdist, when used with \(p = 2\) this is the euclidean distance.
The simple model doesn’t match the style of the huggingface models. Wouldn’t it be better to copy them?
The reason that the huggingface models provide all of that output is to give greater flexibility to downstream tasks. For example, by providing the internal state of the model it is possible to preprocess some data and reuse the preprocessed data for subsequent tasks, saving time. If you don’t require these enhancements then you don’t have to use the huggingface style. You can use it if you wish though - predicting future use is hard after all.
Let’s make a mistake in our implementation of the huggingface style. It’s easy to copy the style of a huggingface model slightly wrong and it can lead to some very strange situations with the metrics.
from typing import *
from transformers import BertModel, BertPreTrainedModel, BertConfig
from transformers.modeling_outputs import SequenceClassifierOutput
import torch
from torch import nn

# THIS CODE HAS A BUG DO NOT COPY

class BertBadHuggingfaceClassifier(BertPreTrainedModel):
    def __init__(self, config: BertConfig) -> None:
        super().__init__(config)
        # copied this bit from BertForSequenceClassification
        # often the transformer is created by a parent class
        self.config = config
        self.bert = BertModel(config)

        self.classifier = nn.Linear(
            in_features=config.hidden_size,
            out_features=2,
            bias=False
        )

    def forward(
        self,
        input_ids: torch.Tensor,
        attention_mask: Optional[torch.Tensor] = None,
        labels: Optional[torch.Tensor] = None,
        return_dict: Optional[bool] = None,
    ) -> Tuple[torch.Tensor, ...]:
        return_dict = return_dict if return_dict is not None else self.config.use_return_dict

        outputs = self.bert(
            input_ids=input_ids,
            attention_mask=attention_mask
        )
        logits = self.classifier(outputs[1])

        loss = None
        if labels is not None:
            # cross entropy is suitable for single class classifiers
            # it's most predictable when the input is [N, classes] floats and the target is [N] integers
            # cross entropy applies softmax for you
            loss = torch.nn.functional.cross_entropy(logits.reshape(-1, 2), labels.flatten())

        output = (logits,) + outputs[2:]

        # THE ERROR IS HERE
        # output is already a tuple, we should be extending it
        # correct code is:
        # return ((loss,) + output) if loss is not None else output
return (loss, output) if loss is not None else outputmodel = BertBadHuggingfaceClassifier.from_pretrained(MODEL_NAME)Some weights of the model checkpoint at bert-base-uncased were not used when initializing BertBadHuggingfaceClassifier: ['cls.seq_relationship.weight', 'cls.predictions.transform.dense.bias', 'cls.seq_relationship.bias', 'cls.predictions.transform.dense.weight', 'cls.predictions.decoder.weight', 'cls.predictions.transform.LayerNorm.weight', 'cls.predictions.transform.LayerNorm.bias', 'cls.predictions.bias']
- This IS expected if you are initializing BertBadHuggingfaceClassifier from the checkpoint of a model trained on another task or with another architecture (e.g. initializing a BertForSequenceClassification model from a BertForPreTraining model).
- This IS NOT expected if you are initializing BertBadHuggingfaceClassifier from the checkpoint of a model that you expect to be exactly identical (initializing a BertForSequenceClassification model from a BertForSequenceClassification model).
Some weights of BertBadHuggingfaceClassifier were not initialized from the model checkpoint at bert-base-uncased and are newly initialized: ['classifier.weight']
You should probably TRAIN this model on a down-stream task to be able to use it for predictions and inference.from pathlib import Path
from transformers import Trainer, TrainingArguments, EvalPrediction
training_args = TrainingArguments(
per_device_train_batch_size=BATCH_SIZE,
per_device_eval_batch_size=BATCH_SIZE,
learning_rate=5e-5,
warmup_ratio=0.06,
report_to=[], # you'd use wandb for weights and biases
# even shorter as this is testing the model and metrics
evaluation_strategy="steps",
max_steps=10,
logging_steps=5,
eval_steps=5,
load_best_model_at_end=True,
metric_for_best_model="accuracy",
greater_is_better=True,
no_cuda=True, # let you run it on any machine
# output_dir is compulsory
logging_dir=MODEL_RUN_FOLDER / "output",
output_dir=MODEL_RUN_FOLDER / "output",
overwrite_output_dir=True,
)
trainer = Trainer(
model=model,
args=training_args,
train_dataset=split_ds["train"],
eval_dataset=split_ds["test"],
tokenizer=tokenizer,
compute_metrics=custom_metrics,
)
trainer.train()max_steps is given, it will override any value given in num_train_epochs
***** Running training *****
Num examples = 1800
Num Epochs = 1
Instantaneous batch size per device = 32
Total train batch size (w. parallel, distributed & accumulation) = 32
Gradient Accumulation steps = 1
Total optimization steps = 10| Step | Training Loss | Validation Loss |
|---|
***** Running Evaluation *****
Num examples = 200
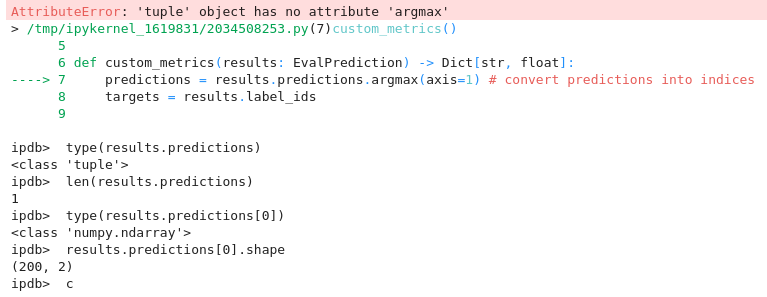
Batch size = 32AttributeError: 'tuple' object has no attribute 'argmax'I used the debugger here to investigate the problem. As you can see the predictions are no longer a numpy array, instead they have become a tuple. This is because of the way the model incorrectly forms the response.
The core problem is that the response from the model has to be well formed and that it is very easy to make a mistake. When you make a mistake you only find out when the metric code runs - which can be after some time if you are doing a full train.
Run your model and metric code early. You can run your metric code directly by evaluating your model:
from pathlib import Path
from transformers import Trainer, TrainingArguments, EvalPrediction

# Reduced this to what is required for an evaluation
training_args = TrainingArguments(
    per_device_eval_batch_size=BATCH_SIZE,

    report_to=[], # you'd use wandb for weights and biases

    no_cuda=True, # let you run it on any machine

    # output_dir is compulsory
    logging_dir=MODEL_RUN_FOLDER / "output",
    output_dir=MODEL_RUN_FOLDER / "output",
    overwrite_output_dir=True,
)

trainer = Trainer(
    model=model,
    args=training_args,
    eval_dataset=split_ds["test"],
    tokenizer=tokenizer,
    compute_metrics=custom_metrics,
)

# THIS IS THE CHANGE
trainer.evaluate()This time lets make it correctly. It really comes down to always returning a tensor as the model output and loss. I have frequently made a mistake where the model output is a tuple instead and you only discover that when the metric calculation fails - the training loop does not inspect the output of the model.
from typing import *
from transformers import BertModel, BertPreTrainedModel, BertConfig
from transformers.modeling_outputs import SequenceClassifierOutput
import torch
from torch import nn

class BertHuggingfaceClassifier(BertPreTrainedModel):
    def __init__(self, config: BertConfig) -> None:
        super().__init__(config)
        # copied this bit from BertForSequenceClassification
        # often the transformer is created by a parent class
        self.config = config
        self.bert = BertModel(config)

        self.classifier = nn.Linear(
            in_features=config.hidden_size,
            out_features=2,
            bias=False
        )

    def forward(
        self,
        input_ids: torch.Tensor,
        attention_mask: Optional[torch.Tensor] = None,
        labels: Optional[torch.Tensor] = None,
        return_dict: Optional[bool] = None,
    ) -> Tuple[torch.Tensor, ...]:
        return_dict = return_dict if return_dict is not None else self.config.use_return_dict

        outputs = self.bert(
            input_ids=input_ids,
            attention_mask=attention_mask
        )
        logits = self.classifier(outputs[1])

        loss = None
        if labels is not None:
            # cross entropy is suitable for single class classifiers
            # it's most predictable when the input is [N, classes] floats and the target is [N] integers
            # cross entropy applies softmax for you
            loss = torch.nn.functional.cross_entropy(logits.reshape(-1, 2), labels.flatten())

        if not return_dict:
            output = (logits,) + outputs[2:]
            return ((loss,) + output) if loss is not None else output

        return SequenceClassifierOutput(
            loss=loss,
            logits=logits,
            hidden_states=outputs.hidden_states,
            attentions=outputs.attentions,
)model = BertHuggingfaceClassifier.from_pretrained(MODEL_NAME)Some weights of the model checkpoint at bert-base-uncased were not used when initializing BertHuggingfaceClassifier: ['cls.predictions.transform.dense.weight', 'cls.predictions.transform.LayerNorm.bias', 'cls.seq_relationship.weight', 'cls.predictions.decoder.weight', 'cls.predictions.bias', 'cls.seq_relationship.bias', 'cls.predictions.transform.dense.bias', 'cls.predictions.transform.LayerNorm.weight']
- This IS expected if you are initializing BertHuggingfaceClassifier from the checkpoint of a model trained on another task or with another architecture (e.g. initializing a BertForSequenceClassification model from a BertForPreTraining model).
- This IS NOT expected if you are initializing BertHuggingfaceClassifier from the checkpoint of a model that you expect to be exactly identical (initializing a BertForSequenceClassification model from a BertForSequenceClassification model).
Some weights of BertHuggingfaceClassifier were not initialized from the model checkpoint at bert-base-uncased and are newly initialized: ['classifier.weight']
You should probably TRAIN this model on a down-stream task to be able to use it for predictions and inference.from pathlib import Path
from transformers import Trainer, TrainingArguments, EvalPrediction
training_args = TrainingArguments(
per_device_train_batch_size=BATCH_SIZE,
per_device_eval_batch_size=BATCH_SIZE,
learning_rate=5e-5,
warmup_ratio=0.06,
report_to=[], # you'd use wandb for weights and biases
# even shorter as this is testing the model and metrics
evaluation_strategy="steps",
max_steps=100,
logging_steps=10,
eval_steps=10,
load_best_model_at_end=True,
metric_for_best_model="accuracy",
greater_is_better=True,
no_cuda=True, # let you run it on any machine
# output_dir is compulsory
logging_dir=MODEL_RUN_FOLDER / "output",
output_dir=MODEL_RUN_FOLDER / "output",
overwrite_output_dir=True,
)
trainer = Trainer(
model=model,
args=training_args,
train_dataset=split_ds["train"],
eval_dataset=split_ds["test"],
tokenizer=tokenizer,
compute_metrics=custom_metrics,
)
trainer.train()max_steps is given, it will override any value given in num_train_epochs
***** Running training *****
Num examples = 1800
Num Epochs = 2
Instantaneous batch size per device = 32
Total train batch size (w. parallel, distributed & accumulation) = 32
Gradient Accumulation steps = 1
Total optimization steps = 100| Step | Training Loss | Validation Loss | Accuracy | Negative Precision | Negative Recall | Negative Fscore | Negative Support | Positive Precision | Positive Recall | Positive Fscore | Positive Support |
|---|---|---|---|---|---|---|---|---|---|---|---|
| 10 | 0.693200 | 0.644840 | 0.690000 | 0.784615 | 0.515152 | 0.621951 | 99 | 0.644444 | 0.861386 | 0.737288 | 101 |
| 20 | 0.635700 | 0.605355 | 0.655000 | 0.826087 | 0.383838 | 0.524138 | 99 | 0.603896 | 0.920792 | 0.729412 | 101 |
| 30 | 0.577800 | 0.497736 | 0.785000 | 0.833333 | 0.707071 | 0.765027 | 99 | 0.750000 | 0.861386 | 0.801843 | 101 |
| 40 | 0.531100 | 0.488882 | 0.770000 | 0.778947 | 0.747475 | 0.762887 | 99 | 0.761905 | 0.792079 | 0.776699 | 101 |
| 50 | 0.523500 | 0.489339 | 0.780000 | 0.823529 | 0.707071 | 0.760870 | 99 | 0.747826 | 0.851485 | 0.796296 | 101 |
| 60 | 0.428700 | 0.469223 | 0.765000 | 0.745283 | 0.797980 | 0.770732 | 99 | 0.787234 | 0.732673 | 0.758974 | 101 |
| 70 | 0.313300 | 0.490093 | 0.785000 | 0.774510 | 0.797980 | 0.786070 | 99 | 0.795918 | 0.772277 | 0.783920 | 101 |
| 80 | 0.371500 | 0.506241 | 0.775000 | 0.806818 | 0.717172 | 0.759358 | 99 | 0.750000 | 0.831683 | 0.788732 | 101 |
| 90 | 0.325700 | 0.475269 | 0.785000 | 0.804348 | 0.747475 | 0.774869 | 99 | 0.768519 | 0.821782 | 0.794258 | 101 |
| 100 | 0.388900 | 0.463786 | 0.795000 | 0.795918 | 0.787879 | 0.791878 | 99 | 0.794118 | 0.801980 | 0.798030 | 101 |
***** Running Evaluation *****
  Num examples = 200
  Batch size = 32
Saving model checkpoint to /data/blog/2021-09-12-train-using-huggingface/runs/output/checkpoint-10
Configuration saved in /data/blog/2021-09-12-train-using-huggingface/runs/output/checkpoint-10/config.json
Model weights saved in /data/blog/2021-09-12-train-using-huggingface/runs/output/checkpoint-10/pytorch_model.bin
tokenizer config file saved in /data/blog/2021-09-12-train-using-huggingface/runs/output/checkpoint-10/tokenizer_config.json
Special tokens file saved in /data/blog/2021-09-12-train-using-huggingface/runs/output/checkpoint-10/special_tokens_map.json
***** Running Evaluation *****
  Num examples = 200
  Batch size = 32
Saving model checkpoint to /data/blog/2021-09-12-train-using-huggingface/runs/output/checkpoint-20
Configuration saved in /data/blog/2021-09-12-train-using-huggingface/runs/output/checkpoint-20/config.json
Model weights saved in /data/blog/2021-09-12-train-using-huggingface/runs/output/checkpoint-20/pytorch_model.bin
tokenizer config file saved in /data/blog/2021-09-12-train-using-huggingface/runs/output/checkpoint-20/tokenizer_config.json
Special tokens file saved in /data/blog/2021-09-12-train-using-huggingface/runs/output/checkpoint-20/special_tokens_map.json
***** Running Evaluation *****
  Num examples = 200
  Batch size = 32
Saving model checkpoint to /data/blog/2021-09-12-train-using-huggingface/runs/output/checkpoint-30
Configuration saved in /data/blog/2021-09-12-train-using-huggingface/runs/output/checkpoint-30/config.json
Model weights saved in /data/blog/2021-09-12-train-using-huggingface/runs/output/checkpoint-30/pytorch_model.bin
tokenizer config file saved in /data/blog/2021-09-12-train-using-huggingface/runs/output/checkpoint-30/tokenizer_config.json
Special tokens file saved in /data/blog/2021-09-12-train-using-huggingface/runs/output/checkpoint-30/special_tokens_map.json
***** Running Evaluation *****
  Num examples = 200
  Batch size = 32
Saving model checkpoint to /data/blog/2021-09-12-train-using-huggingface/runs/output/checkpoint-40
Configuration saved in /data/blog/2021-09-12-train-using-huggingface/runs/output/checkpoint-40/config.json
Model weights saved in /data/blog/2021-09-12-train-using-huggingface/runs/output/checkpoint-40/pytorch_model.bin
tokenizer config file saved in /data/blog/2021-09-12-train-using-huggingface/runs/output/checkpoint-40/tokenizer_config.json
Special tokens file saved in /data/blog/2021-09-12-train-using-huggingface/runs/output/checkpoint-40/special_tokens_map.json
***** Running Evaluation *****
  Num examples = 200
  Batch size = 32
Saving model checkpoint to /data/blog/2021-09-12-train-using-huggingface/runs/output/checkpoint-50
Configuration saved in /data/blog/2021-09-12-train-using-huggingface/runs/output/checkpoint-50/config.json
Model weights saved in /data/blog/2021-09-12-train-using-huggingface/runs/output/checkpoint-50/pytorch_model.bin
tokenizer config file saved in /data/blog/2021-09-12-train-using-huggingface/runs/output/checkpoint-50/tokenizer_config.json
Special tokens file saved in /data/blog/2021-09-12-train-using-huggingface/runs/output/checkpoint-50/special_tokens_map.json
***** Running Evaluation *****
  Num examples = 200
  Batch size = 32
Saving model checkpoint to /data/blog/2021-09-12-train-using-huggingface/runs/output/checkpoint-60
Configuration saved in /data/blog/2021-09-12-train-using-huggingface/runs/output/checkpoint-60/config.json
Model weights saved in /data/blog/2021-09-12-train-using-huggingface/runs/output/checkpoint-60/pytorch_model.bin
tokenizer config file saved in /data/blog/2021-09-12-train-using-huggingface/runs/output/checkpoint-60/tokenizer_config.json
Special tokens file saved in /data/blog/2021-09-12-train-using-huggingface/runs/output/checkpoint-60/special_tokens_map.json
***** Running Evaluation *****
  Num examples = 200
  Batch size = 32
Saving model checkpoint to /data/blog/2021-09-12-train-using-huggingface/runs/output/checkpoint-70
Configuration saved in /data/blog/2021-09-12-train-using-huggingface/runs/output/checkpoint-70/config.json
Model weights saved in /data/blog/2021-09-12-train-using-huggingface/runs/output/checkpoint-70/pytorch_model.bin
tokenizer config file saved in /data/blog/2021-09-12-train-using-huggingface/runs/output/checkpoint-70/tokenizer_config.json
Special tokens file saved in /data/blog/2021-09-12-train-using-huggingface/runs/output/checkpoint-70/special_tokens_map.json
***** Running Evaluation *****
  Num examples = 200
  Batch size = 32
Saving model checkpoint to /data/blog/2021-09-12-train-using-huggingface/runs/output/checkpoint-80
Configuration saved in /data/blog/2021-09-12-train-using-huggingface/runs/output/checkpoint-80/config.json
Model weights saved in /data/blog/2021-09-12-train-using-huggingface/runs/output/checkpoint-80/pytorch_model.bin
tokenizer config file saved in /data/blog/2021-09-12-train-using-huggingface/runs/output/checkpoint-80/tokenizer_config.json
Special tokens file saved in /data/blog/2021-09-12-train-using-huggingface/runs/output/checkpoint-80/special_tokens_map.json
***** Running Evaluation *****
  Num examples = 200
  Batch size = 32
Saving model checkpoint to /data/blog/2021-09-12-train-using-huggingface/runs/output/checkpoint-90
Configuration saved in /data/blog/2021-09-12-train-using-huggingface/runs/output/checkpoint-90/config.json
Model weights saved in /data/blog/2021-09-12-train-using-huggingface/runs/output/checkpoint-90/pytorch_model.bin
tokenizer config file saved in /data/blog/2021-09-12-train-using-huggingface/runs/output/checkpoint-90/tokenizer_config.json
Special tokens file saved in /data/blog/2021-09-12-train-using-huggingface/runs/output/checkpoint-90/special_tokens_map.json
***** Running Evaluation *****
  Num examples = 200
  Batch size = 32
Saving model checkpoint to /data/blog/2021-09-12-train-using-huggingface/runs/output/checkpoint-100
Configuration saved in /data/blog/2021-09-12-train-using-huggingface/runs/output/checkpoint-100/config.json
Model weights saved in /data/blog/2021-09-12-train-using-huggingface/runs/output/checkpoint-100/pytorch_model.bin
tokenizer config file saved in /data/blog/2021-09-12-train-using-huggingface/runs/output/checkpoint-100/tokenizer_config.json
Special tokens file saved in /data/blog/2021-09-12-train-using-huggingface/runs/output/checkpoint-100/special_tokens_map.json


Training completed. Do not forget to share your model on huggingface.co/models =)


Loading best model from /data/blog/2021-09-12-train-using-huggingface/runs/output/checkpoint-100 (score: 0.795).
TrainOutput(global_step=100, training_loss=0.478927800655365, metrics={'train_runtime': 216.1962, 'train_samples_per_second': 14.801, 'train_steps_per_second': 0.463, 'total_flos': 81568536367104.0, 'train_loss': 0.478927800655365, 'epoch': 1.75})After training a model it’s a very good idea to save it.
If you have to restart your notebook or it crashes then you can lose your model. Even worse, when using a GPU if you hit a CUDA error then the graphics card can end up in an error state where you will not be able to perform operations - not even saving your model.
from pathlib import Path

model.save_pretrained(Path("/data/blog/2021-09-12-train-using-huggingface/model"))
Configuration saved in /data/blog/2021-09-12-train-using-huggingface/model/config.json
Model weights saved in /data/blog/2021-09-12-train-using-huggingface/model/pytorch_model.binYou can load this model by passing the folder to load_pretrained.
from pathlib import Path

model = BertHuggingfaceClassifier.from_pretrained(
    Path("/data/blog/2021-09-12-train-using-huggingface/model")
)
loading configuration file /data/blog/2021-09-12-train-using-huggingface/model/config.json
Model config BertConfig {
"_name_or_path": "bert-base-uncased",
"architectures": [
"BertHuggingfaceClassifier"
],
"attention_probs_dropout_prob": 0.1,
"gradient_checkpointing": false,
"hidden_act": "gelu",
"hidden_dropout_prob": 0.1,
"hidden_size": 768,
"initializer_range": 0.02,
"intermediate_size": 3072,
"layer_norm_eps": 1e-12,
"max_position_embeddings": 512,
"model_type": "bert",
"num_attention_heads": 12,
"num_hidden_layers": 12,
"pad_token_id": 0,
"position_embedding_type": "absolute",
"torch_dtype": "float32",
"transformers_version": "4.9.2",
"type_vocab_size": 2,
"use_cache": true,
"vocab_size": 30522
}
loading weights file /data/blog/2021-09-12-train-using-huggingface/model/pytorch_model.bin
All model checkpoint weights were used when initializing BertHuggingfaceClassifier.
All the weights of BertHuggingfaceClassifier were initialized from the model checkpoint at /data/blog/2021-09-12-train-using-huggingface/model.
If your task is similar to the task the model of the checkpoint was trained on, you can already use BertHuggingfaceClassifier for predictions without further training.We want to be able to spot check the model to ensure that the evaluation code is legitimate. It’s easy to write a metric that doesn’t actually check what you want. Luckily evaluating the model is easy - we just have to invoke it and inspect the output.
from typing import *
from transformers import AutoTokenizer
from pathlib import Path
import torch

# load the saved model
model = BertHuggingfaceClassifier.from_pretrained(Path("/data/blog/2021-09-12-train-using-huggingface/model"))

tokenizer = AutoTokenizer.from_pretrained(MODEL_NAME)

# put the model into evaluate mode to disable things like dropout
model.eval()

@torch.no_grad() # disable gradient calculation - makes it much faster and use less memory
def evaluate(text: str) -> Dict[str, float]:
    tokens = tokenizer(
        text,
        return_tensors="pt",         # return pytorch tensors
        return_attention_mask=False, # not needed for a single row
        return_token_type_ids=False  # not needed for this classification task
    )

    # tokens is a dictionary that matches the kwargs of the model
    # so we can just use it directly
    output = model(**tokens)

    # output is always batched so this gets the only row
    predictions = output.logits[0]
    predictions = predictions.softmax(dim=-1)

    negative, positive = predictions.tolist()
    return {
        "negative": negative,
        "positive": positive,
}evaluate("I like cheese"){'negative': 0.5746235251426697, 'positive': 0.4253765046596527}evaluate("Mondays are the worst"){'negative': 0.9113974571228027, 'positive': 0.08860251307487488}evaluate("Sunday funday"){'negative': 0.079623743891716, 'positive': 0.9203762412071228}This model clearly has strong feelings about cheese. How very dare it.
Considering how little this was trained this is doing ok. An accuracy of high 70s is believable.
There are several ways that you can extend this approach to improve the model you are creating. I’m going to introduce a few of them here, however this is already quite long so I will not be thoroughly exploring them.
The approach that I have outlined in this involves taking a well trained model and replacing the head of it. This means you have part of the model that has been trained extensively, and another part that is freshly initialized.

When training the model the changes to the weights affect both parts, so the well trained body is updated to try to improve the untrained head. This then degrades the body weights.
If the classification head was first trained without altering the body then the weights within it could become better than random. After that the whole model could be trained to allow the body to support the classifier more.

This technique is used in the FastAI course and was introduced in (Howard and Ruder 2018):
Gradual unfreezing
Rather than fine-tuning all layers at once, which risks catastrophic forgetting, we propose to gradually unfreeze the model starting from the last layer as this contains the least general knowledge (Yosinski et al., 2014): We first unfreeze the last layer and fine-tune all unfrozen layers for one epoch. We then unfreeze the next lower frozen layer and repeat, until we fine-tune all layers until convergence at the last iteration. This is similar to ‘chain-thaw’ (Felbo et al., 2017), except that we add a layer at a time to the set of ‘thawed’ layers, rather than only training a single layer at a time.
Another improvement to this approach is to have a gradually increased learning rate as you move from the start of the body to the end of the classification head. The principle behind the increased learning rate is that the start of the model deals with basic universal qualities of text, while the end of the model is specific to the task at hand. By reducing the rate at which the start of the model can change you preserve the universal knowledge that the model already encodes. This was introduced in the same paper as discriminative fine-tuning.
Discriminative fine-tuning
As different layers capture different types of information (Yosinski et al., 2014), they should be fine-tuned to different extents. In CV where fine-tuning the entire model is too costly as networks can have more than 100 layers (Huang et al., 2017), a common practice is to fine-tune initially just the last hidden layer, and then unfreeze additional layers for further fine-tuning.
The simplest approach to treating different layers appropriately is to fine-tune the model one layer at a time, analogous to greedy layer-wise training (Bengio et al., 2007) and ‘chain-thaw’ (Felbo et al., 2017). However, this introduces a sequential requirement, hindering parallelism, and requires multiple passes through the dataset, resulting in overfitting for small datasets. For this reason, we propose a more efficient fine-tuning method, discriminative fine-tuning.
Instead of using the same learning rate for all layers of the model, discriminative fine-tuning allows us to tune each layer with different learning rates
To apply these techniques to the trainer you need to create your own optimizer (and optionally scheduler). You can supply multiple separate optimizer/scheduler pairs to the trainer.
Training a sequence to sequence model involves using a Seq2SeqTrainer and associated arguments. The key difference is that a sequence to sequence model is expected to step through the input and labels one token at a time, at each point making a prediction. So for them a single input row is like a batch as it has to process it many times. This is different enough to the normal training process that it requires a custom trainer.
The simple transformers library builds on the transformers library to simplify the process of training your own models. I’ve used it briefly before and it worked well to train RoBERTa on a regression task. It is good and I do recommend it.
Even though I say all this I still do not use it often.
The huggingface code is well documented and relatively easy to read. If you review the task specific versions of each model you can see the way in which they customize the model to meet the requirements of the task. Going through the models from old to new will also show you how the techniques involved have progressed.
Remember you can just use ?? in a jupyter notebook to see the source code for anything.
Copying an existing task head and adjusting it to your needs is an easy way to get familiar with deep learning model creation.